RoofViews

Residential Roofing

All about Roofing Nails for Shingles

By Mark Soto

March 28, 2023

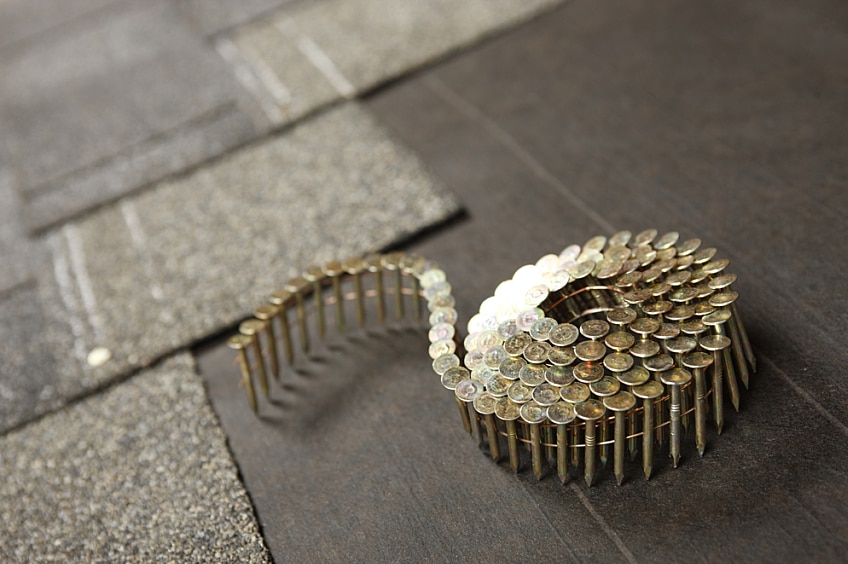
A coil of roofing nails on a new roof in progress

Even the smallest details play a role in a roof's effectiveness and integrity. Shingles and flashing are among the most noticeable roofing materials, but roof nails often get overlooked—despite being just as important as more obvious elements. And since they can greatly differ in size, material, and length, using the wrong nails to secure certain areas can cause all kinds of problems down the road.

Types of Roofing Nails

When nailing shingles, roofers mostly choose from among these four common types of roofing nail:

  • Typical roofing and ring-shank nails are the most commonly used. Typical roofing nails may have a smooth or circular unconnected rings around the body to help them maintain grip in the deck. Ring shank nails have connected rings around the shaft which give them superior withdrawal resistance during high winds. Either nail will keep shingles securely attached to the roof when installed according to the manufacturer's instructions. That said, ring shank nails have superior withdrawal resistance—which is why they're typically used in high-wind areas and are often required by local codes. Both of these nail types also offer strength and the ability to penetrate the deck below with ease.

  • Square and round cap nails are more commonly used for roof underlayment than shingles. The larger caps provide holding power that keeps the underlayment material in place using fewer nails.

Types of Roofing Nail Materials

What the nail is made of is often just as important as the type of nail:

  • Galvanized steel: While less corrosion-resistant than stainless steel, these nails are popular as they still have strong corrosion- and rust-resistance (courtesy of their zinc coating) but cost much less than stainless steel. There are two main types: hot-dipped galvanized and electro-galvanized. Hot-dipped is more robust, since the nail is immersed in a melted zinc solution, which creates a strong coating. Electro-galvanized combines electricity with a less powerful chemical solution to create a thinner zinc coating.

  • Copper roofing nails are resistant to corrosion and can last much longer than steel. However, they're typically a more expensive option. Copper is more often used when installing long-lasting roofing materials like tile and clay. If you use copper flashing for the roof, it's best practice to use the same material for the nails. However, steel nails are acceptable, though mixing galvanized nails with copper can cause a galvanic reaction that leads to some corrosion in both.

  • Stainless steel nails are typically only used in environments very likely to cause corrosion, most commonly in coastal regions.

  • Aluminum nails are not as commonly used, especially in coastal areas since salt spray can damage the nail and may cause it to deteriorate prematurely.

Nails for Roof Underlayment, Flashing, and Sheathing

Different roof components call for different nails. For underlayment, use square cap nails for felt and round head for synthetics (both nail types come with either metal or plastic caps). When installing flashing, you can simply opt for the same nails for the shingles, as they don't require any special properties. For flashing and sheathing, standard roof nails will do the trick.

Hand-Driven Nailing vs. Pneumatic Nailer

You will need to decide whether to hand-drive the nails with a hammer or use a pneumatic nailer.

Using the pneumatic nailer is a much faster solution than hammering manually. Many shingles come with warranties that require you to install at least four nails per shingle, with some of them needing up to six. As well as time considerations, using a pneumatic nailer is obviously significantly less physically demanding than manual hammering.

That said, an upside of using a hammer is that you have better overall control over nail placement. You can ensure a nail is tightly fitted and properly penetrates the decking, which can help in the long term as issues may arise if a nail is over- or under-driven. When nails are over-driven—meaning they go well past the material below it—it can cause openings in the shingles which can lower wind resistance (among other issues). When under-driven, nails don't fully penetrate the decking, which can lead to loose or falling shingles and leaks over time.

Size and Length of Roofing Nails

Typically, a roofing nail measures anywhere from 1 to 2 inches. A roofing nail should be long enough to penetrate the shingle and then as the plywood or OSB decking beneath by at least 3/4 of an inch. The sheathing thickness can vary, so you may need longer nails depending on the decking used.

Keep in mind that some parts of the roof—like hip and ridge cap shingles, and ventilation accessories such as a ridge vent—require longer nails. Some premium or designer shingles may also require longer nails than standard 3-tab shingles, as they tend to be thicker (usually often consisting of two shingle strips fused together).

Another thing to note is that 3/4-inch or 7/8-inch nails may be used at open soffit areas so as to not completely penetrate the decking. Completely penetrating the decking can cause the material underneath—most often finished wood—to splinter as well as the nail to be visible from the ground.

Most manufacturers recommend using zinc-coated steel or aluminum, 10-12 gauge, barbed, deformed, or smooth shank roofing nails with heads 3/8" (10mm) to 7/16" (12mm) in diameter. Fasteners should be long enough to penetrate at least 3/4" (19mm) into wood decks or just through the plywood decks. Fasteners must be driven flush with the surface of the shingle. Over-driving will damage the shingle. Raised fasteners will interfere with the sealing of the shingles and can back out.

Apply Your Nail Knowledge in Practice!

While useful, having a good working knowledge of what materials to use for a job is only half the equation. If you'd like hands-on training to see how to apply your knowledge in practice—and given by some of the leading experts in roofing—check out the GAF CARE Contractor Training Center.
About the Author

Mark Soto is a freelance writer from Milwaukee, Wisconsin. He has comprehensive knowledge of home improvement projects based on his previous work. Mark comes from a family of DIYers and has worked with landscapers, plumbers, painters and other contractors. He also writes about camping and his enthusiasm for the outdoors.

Related Articles

Installation of ISO Board and TPO on a Roof
Building Science

Roof Insulation: A Positive Investment to Reduce Total Carbon

Have you ever thought about building products reducing the carbon dioxide emissions caused by your building? When considered over their useful life, materials like insulation decrease total carbon emissions thanks to their performance benefits. Read on for an explanation of how this can work in your designs.What is Total Carbon?Total carbon captures the idea that the carbon impacts of buildings should be considered holistically across the building's entire life span and sometimes beyond. (In this context, "carbon" is shorthand for carbon dioxide (CO2) emissions.) Put simply, total carbon is calculated by adding a building's embodied carbon to its operational carbon.Total Carbon = Embodied Carbon + Operational CarbonWhat is Embodied Carbon?Embodied carbon is comprised of CO2 emissions from everything other than the operations phase of the building. This includes raw material supply, manufacturing, construction/installation, maintenance and repair, deconstruction/demolition, waste processing/disposal of building materials, and transport between each stage and the next. These embodied carbon phases are indicated by the gray CO2 clouds over the different sections of the life cycle in the image below.We often focus on "cradle-to-gate" embodied carbon because this is the simplest to calculate. "Cradle-to-gate" is the sum of carbon emissions from the energy consumed directly or indirectly to produce the construction materials used in a building. The "cradle to gate" approach neglects the remainder of the embodied carbon captured in the broader "cradle to grave" assessment, a more comprehensive view of a building's embodied carbon footprint.What is Operational Carbon?Operational carbon, on the other hand, is generated by energy used during a building's occupancy stage, by heating, cooling, and lighting systems; equipment and appliances; and other critical functions. This is the red CO2 cloud in the life-cycle graphic. It is larger than the gray CO2 clouds because, in most buildings, operational carbon is the largest contributor to total carbon.What is Carbon Dioxide Equivalent (CO2e)?Often, you will see the term CO2e used. According to the US Environmental Protection Agency (EPA), "CO2e is simply the combination of the pollutants that contribute to climate change adjusted using their global warming potential." In other words, it is a way to translate the effect of pollutants (e.g. methane, nitrous oxide) into the equivalent volume of CO2 that would have the same effect on the atmosphere.Today and the FutureToday, carbon from building operations (72%) is a much larger challenge than that from construction materials' embodied carbon (28%) (Architecture 2030, 2019). Projections into 2050 anticipate the operations/embodied carbon split will be closer to 50/50, but this hinges on building designs and renovations between now and 2050 making progress on improving building operations.Why Insulation?Insulation, and specifically continuous insulation on low-slope roofs, is especially relevant to the carbon discussion because, according to the Embodied Carbon 101: Envelope presentation by the Boston Society for Architecture: Insulation occupies the unique position at the intersection of embodied and operational carbon emissions for a building. Insulation is the only building material that directly offsets operational emissions. It can be said to pay back its embodied carbon debt with avoided emissions during the building's lifetime.A Thought Experiment on Reducing Total CarbonTo make progress on reducing the total carbon impact of buildings, it is best to start with the largest piece of today's pie, operational carbon. Within the range of choices made during building design and construction, not all selections have the same effect on operational carbon.When making decisions about carbon and energy reduction strategies, think about the problem as an "investment" rather than a "discretionary expense." Discretionary expenses are easier to reduce or eliminate by simply consuming less. In the example below, imagine you are flying to visit your client's building. Consider this a "discretionary expense." The input on the far left is a given number of kilograms of carbon dioxide equivalent (CO2e) generated for the flight, from the manufacturing of the airplane, to the fuel it burns, to its maintenance. The output is the flight itself, which creates CO2 emissions, but no durable good. In this case, the only CO2 reduction strategy you can make is to make fewer or shorter flights, perhaps by consolidating visits, employing a local designer of record, or visiting the building virtually whenever possible. Now consider the wallpaper you might specify for your client's building. It involves a discretionary expenditure of CO2e, in this case, used to produce a durable good. However, this durable good is a product without use-phase benefits. In other words, it cannot help to save energy during the operational phase of the building. It has other aesthetic and durability benefits, but no operational benefits to offset the CO2 emissions generated to create it. Your choices here are expanded over the previous example of an airplane flight. You can limit CO2 by choosing a product with a long useful life. You can also apply the three Rs: reduce the quantity of new product used, reuse existing material when possible, and recycle product scraps at installation and the rest at the end of its lifespan. In the final step in our thought experiment, consider the insulation in your client's building. As before, we must generate a certain amount of CO2e to create a durable good. In this case, it's one with use-phase benefits. Insulation can reduce operational energy by reducing heat flow through the building enclosure, reducing the need to burn fuel or use electricity to heat and cool the building. The good news is that, in addition to the other strategies considered for the flight and the wallpaper, here you can also maximize operational carbon savings to offset the initial embodied carbon input. And, unlike the discretionary nature of some flights and the often optional decision to use furnishings like wallpaper, heating and cooling are necessary for the functioning of almost all occupied buildings.Based on this example, you can consider building products with operational benefits, like insulation, as an "investment." It is appropriate to look at improving the building enclosure and understanding what the return on the investment is from a carbon perspective. As the comparison above demonstrates, if you have a limited supply of carbon to "invest", putting it into more roof insulation is a very smart move compared to "spending" it on a discretionary flight or on a product without use-phase carbon benefits, such as wallpaper.This means we should be careful not to measure products like insulation that save CO2e in the building use-phase savings only by their embodied carbon use, but by their total carbon profile. So, how do we calculate this?Putting It to the TestWe were curious to know just how much operational carbon roof insulation could save relative to the initial investment of embodied carbon required to include it in a building. To understand this, we modeled the US Department of Energy's (DOE) Standalone Retail Prototype Building located in Climate Zone 4A to comply with ASHRAE 90.1-2019 energy requirements. We took the insulation product's embodied energy and carbon data from the Polyisocyanurate Insulation Manufacturers Association's (PIMA) industry-wide environmental product declaration (EPD).To significantly reduce operational carbon, the largest carbon challenge facing buildings today, the returns on the investment of our building design strategies need to be consistent over time. This is where passive design strategies like building enclosure improvements really shine. They have much longer service lives than, for example, finish materials, leading to sustained returns.Specifically, we looked here at how our example building's roof insulation impacted both embodied and operational carbon and energy use. To do this, we calculated the cumulative carbon savings over the 75-year life of our model building. In our example, we assumed R-30 insulation installed at the outset, increased every 20 years by R-10, when the roof membrane is periodically replaced.In our analysis, the embodied CO2e associated with installing R-30 (shown by the brown curve in years -1 to 1), the embodied carbon of the additional R-10 of insulation added every 20 years (too small to show up in the graph), and the embodied carbon represented by end-of-life disposal (also too small to show up) are all taken into account. About five months after the building becomes operational, the embodied carbon investment of the roof insulation is dwarfed by the operational savings it provides. The initial and supplemental roof insulation ultimately saves a net of 705 metric tons of carbon over the life of the building.If you want to see more examples like the one above, check out PIMA's study, conducted by the consulting firm ICF. The research group looked at several DOE building prototypes across a range of climate zones, calculating how much carbon, energy, and money can be saved when roof insulation is upgraded from an existing baseline to current code compliance. Their results can be found here. Justin Koscher of PIMA also highlighted these savings, conveniently sorted by climate zone and building type, here.Support for Carbon Investment DecisionsSo how can you make sure you address both operational and embodied carbon when making "carbon investment" decisions? We've prepared a handy chart to help.First, when looking at lower-embodied-carbon substitutions for higher-embodied-carbon building materials or systems (moving from the upper-left red quadrant to the lower-left yellow quadrant in the chart), ensure that the alternatives you are considering have equivalent performance attributes in terms of resilience and longevity. If an alternative material or system has lower initial embodied carbon, but doesn't perform as well or last as long as the specified product, then it may not be a good carbon investment. Another consideration here is whether or not the embodied carbon of the alternative is released as emissions (i.e. as part of its raw material supply or manufacturing, or "cradle to gate" stages), or if it remains in the product throughout its useful life. In other words, can the alternative item be considered a carbon sink? If so, using it may be a good strategy.Next, determine if the alternative product or system can provide operational carbon savings, even if it has high embodied energy (upper-right yellow quadrant). If the alternative has positive operational carbon impacts over a long period, don't sacrifice operational carbon savings for the sake of avoiding an initial embodied product carbon investment when justified for strategic reasons.Last, if a product has high operational carbon savings and relatively low embodied carbon (lower-right green quadrant), include more of this product in your designs. The polyiso roof insulation in our example above fits into this category. You can utilize these carbon savings to offset the carbon use in other areas of the design, like aesthetic finishes, where the decision to use the product may be discretionary but desired.When designing buildings, we need to consider the whole picture, looking at building products' embodied carbon as a potential investment yielding improved operational and performance outcomes. Our design choices and product selection can have a significant impact on total carbon targets for the buildings we envision, build, and operate.Click these links to learn more about GAF's and Siplast's insulation solutions. Please also visit our design professional and architect resources page for guide specifications, details, innovative green building materials, continuing education, and expert guidance.We presented the findings in this blog in a presentation called "Carbon and Energy Impacts of Roof Insulation: The Whole[-Life] Story" given at the BEST6 Conference on March 19, 2024 in Austin, Texas.References:Architecture 2030. (2019). New Buildings: Embodied Carbon. https://web.archive.org/web/20190801031738/https://architecture2030.org/new-buildings-embodied/ Carbon Leadership Forum. (2023, April 2). 1 - Embodied Carbon 101. https://carbonleadershipforum.org/embodied-carbon-101/

By Authors Elizabeth Grant

September 13, 2024

Missing shingles on a roof.
Your Home

Missing Shingles on Your Roof? Here's What to Do

If you notice missing shingles on your roof, there's no need to panic. Missing shingles aren't an emergency, but you should still act quickly, especially during wet seasons. Your roof is a multilayered system designed to protect your home's structure and finishes from water damage.If you ignore missing shingles, moisture can get into your home, leading to issues such as rot, mold, and costly water damage. Replacing missing shingles quickly can mean the difference between a minor roof repair and a total roof replacement.So, here's how to spot missing shingles and hire a roofer to replace them.How to Spot Missing ShinglesLocating missing shingles, before leaks set in, can save you time, money, and peace of mind. Here are several ways to spot them before they cause bigger issues.Inspect Your Roof from the GroundScope your roof with binoculars for signs of missing shingles. Inspecting your roof from the ground helps prevent shingle damage from walking on the roof and, most importantly, fall-related injuries. Scan your roof from every angle that it's safe to do so, including from streets, sidewalks, and neighbors' yards if you have permission to do so.Check for Shingle ChangesSystematically check each shingle following a horizontal or vertical line. A missing shingle often sticks out as a color change in your shingle pattern. While you're at it, look for shingles that are cracked, curled, or sagging or that aren't aligned with the others. These can all be signs of shingle or roof damage.Review Your Roof for Damage after StormsRoof damage often happens as a result of extreme weather. Once it's safe to be outdoors, visually inspect your roof for damage. You can also survey the ground around your property to spot any shingles that may have blown off.Look Inside Your Home for LeaksCheck inside your home for longer-term signs of missing shingles. Evidence of leaks in your attic or water stains on your interior ceilings or walls can indicate wider-spread water damage in your home. If you notice anything out of the ordinary, have a roofing professional inspect the area (both inside and outside) for damage.Schedule a Professional Roof InspectionThe National Roofing Contractors Association recommends professional-level roof inspections twice a year—once in the spring and once in the fall. Like routine car maintenance keeps repair costs down, roof inspections can help spot small concerns before they potentially become expensive problems.How to Hire a RooferOnce you spot missing shingles on your roof, the next step is hiring a professional to replace them. Create a list of questions before you call around, so you can find a reliable roofing company that won't cut corners.If you have warranties, you may also want to check whether or not those have any requirements. For example, all GAF roofing shingles and qualifying accessories (the "GAF Products") come with the coverage provided by the GAF Shingle & Accessory Limited Warranty,** and you don't need to do anything at all to get it.How to Prepare for Roofing RepairsThough every contractor is different, confirm certain details before signing any contracts. Here's how you can ensure you and your contractor are on the same page before work begins:Communicate clearly from the start; this will help prevent frustration and unexpected costs.Before making a deposit, be sure you both agree on the quote and job details.Agree on the job's start date, plus a contingency plan if bad weather forces a rain check. Ask your roofer if they'll install a temporary tarp to prevent water damage in the case of a delay.Read your quote carefully. Confirm approximate labor costs and the color, style, and brand of shingles that will be installed.Ask about anticipated material quantities and estimated roofing material costs (like flashing, roofing nails, etc.).Confirm whether the repair job includes cleanup costs and if the roofer will remove any debris.When to Consider a Roof ReplacementLook at the big picture before replacing missing shingles. Consider your roof's age, any warranties on your roof system, the extent of the roof damage (both internally and externally), and whether the missing shingles are an isolated issue. Multiple missing shingles or frequent repairs could be a sign that you need a new roof.Ready to schedule a professional roof inspection? Contact a GAF-certified roofing contractor* to get started.*Contractors enrolled in GAF certification programs are not employees or agents of GAF, and GAF does not control or otherwise supervise these independent businesses. Contractors may receive benefits, such as loyalty rewards points and discounts on marketing tools from GAF for participating in the program and offering GAF enhanced warranties, which require the use of a minimum amount of GAF products. Your dealings with a Contractor, and any services they provide to you, are subject to the GAF Contractor Terms of Use.* *GAF Accessory Products covered under this limited warranty include: GAF Ridge Cap Shingles, GAF Starter Strip Shingles, GAF Leak Barrier Products, GAF Roof Deck Protection Products, and GAF Attic Ventilation Products. For a complete list of qualifying GAF products visit gaf.com/LRS. This limited warranty does not cover low-slope membranes. See gaf.com for a copy of the limited warranties covering those products.

By Authors Annie Crawford

September 10, 2024

A commercial roof drain.
Commercial Roofing

The Importance of Commercial Drain Maintenance

A low-slope commercial roofing system is responsible for keeping the elements out of the building. During heavy rain, water with nowhere else to go may pond on the roof. A roof drain prevents water from ponding by providing a way for it to leave the roof, and regular commercial drain maintenance ensures its continued performance.Although commercial buildings may appear to have flat roofs, some roofs have slopes built into the structure or require added slopes, typically achieved with tapered insulation to facilitate water drainage. This slope is designed to guide water to a drain, so it doesn't sit on the roof and damage the roofing system or structure. Standing water can slowly deteriorate certain roofing materials and cause premature degradation, failure, or damage. It can also promote algae and plant growth and attract nuisances such as birds and insects.Guiding Water off the RoofResidential roofs have gravity on their side—water flows down the slopes into gutters that transport it away from the home. Commercial buildings with low-slope roofs have to work a little harder to remove water, which is where roof drains come into play.The roofing system design can help guide water toward the drains. It often involves using tapered insulation such as GAF EnergyGuard™ tapered polyiso insulation. The two most popular tapered boards deliver a 1/8-inch or 1/4-inch per foot slope. This slight slope prevents water from standing on the roof, forcing it toward a drain strategically installed at various low points on the roof with crickets and saddles.Drain placement is particularly essential when the parapet wall sheds water. To help water arrive at the drain line or gutter, tapered crickets are typically installed in corners and between drains to direct the flow and alleviate ponding. This water must flow down the roof side of the parapet wall and follow the roof slope to reach the drain.3 Common Types of Roof DrainsInner DrainsInner drains are connected to sloped pipes under the roof that carry water off the roof and away from the building. They typically rely on gravity and the roof's slope to get water to the drain.ScuppersScuppers are found at the roof's edge, usually installed through a hole in the parapet wall. They're designed to drain water from the roof into a downspout or may extend out from the building to shed water.Siphonic DrainsSiphonic drains feature a baffle that keeps air out and allows water to fill the pipes. Once the pipes are full, the lack of air creates a vacuum that siphons water from the roof at a high velocity. The baffle also keeps leaves and debris from gathering in the drain and causing a blockage.Caring for and Maintaining Roof DrainsInspecting and maintaining roof drains should be part of your regular roof inspections. Because roof drains are located at low points on the roof, it's easy for debris or leaves to build up in these areas. Clearing debris is essential for the drains to function properly. Clogs encourage pools of water to form on the rooftop, which can cause structural issues for the building. Even just an inch of standing water can add thousands of pounds of weight to the roof, reinforcing the need for regular commercial drain maintenance.Advancing Roof Drain Maintenance with TechnologyGAF recently introduced the Steely Drain™. This is a roof drain solution that leverages technology allowing contractors to build their maintenace relationship by setting up building maintenance reminders to contact building owners or facility managers. This contractor-inspired drain is made of 316L marine-grade stainless steel, making it ideal for tough environments that require exceptional corrosion resistance.Steely Drain™ features a QR code etched onto the top that you can scan with your smartphone to instantly view information about the roofing system. This data can include the contact information of the contractor who installed the system, the architect and consultants for the project, and the roofing system details if all information is inputted.This critical data is managed from a convenient GAF-hosted dashboard and plays an important role in the roof's maintenance plan. Contractors can set up and receive email reminders when it's time to perform scheduled roof and drain inspections. The dashboard also eliminates the need for core cuts since every detail of the roofing system is available through the QR code—from the deck type to the cover board, underlayment, insulation type and thickness, to the final membrane.Knowledge Is Key to SuccessWhen properly installed and maintained, roof drains can keep the rooftop free of standing water for many years. Curious to learn more? Explore how the Steely Drain™ can help you with your ongoing maintenance programs. You can also visit the GAF CARE Contractor Training Center to gain additional tips and access valuable training courses that allow you to learn at your own pace.

By Authors Karen L Edwards

August 29, 2024

Don't miss another GAF RoofViews post!

Subscribe now