RoofViews

Residential Roofing

Attic Ventilation Options: What You Need to Know

By Jeff Avitabile

October 29, 2020

Unfinished roof frame of new residential construction.

Understanding your attic ventilation options can lead to higher quality roof system installations, which in turn boosts your business and helps keep your customers happy. Sounds like an all-around win, right? Fortunately, installing the right attic ventilation options can be a bit simpler when you know how to calculate the proper amount of ventilation and choose the right products for the job.

Installing effective ventilation—and helping your customers understand what you're doing—can also build trust and respect among your customers. When you talk about proper attic ventilation, you differentiate yourself from your competitors. Instead of dropping off a shingle sample board and a quote with the customer, you can raise the bar by teaching your customer about other important parts of a roofing system.

When it comes to your attic ventilation options, here are some key things you should know.

Why Attic Ventilation Is Important

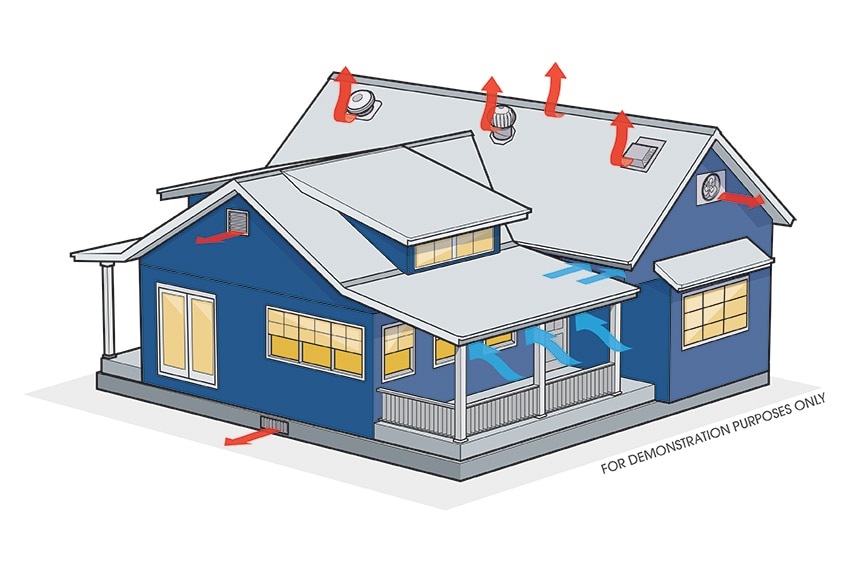
A properly ventilated attic allows air to flow in at the lowest point and escape at the highest point. Ventilation helps protect the roof system from the inside out in virtually all climates and weather conditions.

To help your customers understand how important attic ventilation is, consider touching on the following talking points:

  • Energy efficiency: Excessive heat in an unventilated attic may cause your AC unit to work overtime and contribute to increased energy costs. Proper attic ventilation can help promote the home's energy efficiency by allowing convection to do some of the work instead. Cooler, dry air pushes out excessive heat and moisture.

  • Moisture Damage: Without the flow of drier outside air through the attic, condensation and moisture can collect in attics and lead to all kinds of problems. Mold can flourish in unventilated areas. Insulation impacted by moisture may lose R-value—again potentially impacting energy bills. Moisture and condensation can lead to potential damage to roofing products and structural supports.

  • Ice Damming: Without proper ventilation, heat from the home's interior can collect in the attic and, in conjunction with the sun, can melt the snow on the roof. The melted snow flows down to the lower portion of the roof, then freezes again at night as the exterior temperature drops. This cycle of freeze and thaw can cause ice to back up under the shingles, which can damage the roof system and lead to expensive interior damage such as stained interior drywall and wet insulation. Proper ventilation allows cool exterior air into the attic to reduce that interior heat build-up, which in turn helps to reduce the melting and freezing cycle that typically causes ice damming.

How to Calculate Ventilation

Use this quick, three-step process to find the right attic ventilation for each house.

  1. Measure the attic floor space (L x W) of the area to be ventilated. Get inside the attic; don't just use the roof plane as the basis for measurement.

  2. Calculate the total attic ventilation needed with the easy-to-use 1:300 rule. Install a minimum of 1 square foot of attic ventilation for every 300 square feet of attic floor space being ventilated when using soffit to ridge venting, per the U.S. Federal Housing Authority. This online ventilation calculator does the math for you.

  3. Divide the total ventilation needed in half. One half will be exhaust ventilation, and the other half will be intake ventilation. It's crucial that exhaust and intake be evenly split (commonly referred to as a balanced system)—otherwise, the system can be rendered ineffective. Unfortunately, many times intake ventilation is overlooked, whether due to a lack of soffits, complicated roof design, or simply because you just didn't think about it.

How to Choose Attic Ventilation Options

An industry leader installs ventilation products tailored to the customer's roof style, architecture, and regional climate—not just what's cheapest and easiest.

Exhaust Ventilation

Install exhaust ventilation at the highest roof point to move as much hot, moist air out of the attic as possible. Ridge vents, like those in the GAF Cobra® product line, are typically installed at the ridge or peak of the roof to move hot air out. There are also various off-ridge exhaust options, like the GAF Master Flow® product line, for modern roof designs with limited ridge. These options include power attic vents, roof louvers, and wind turbines.

Intake Ventilation

Intake ventilation is installed at the lowest portion of the roof to allow cooler, drier outside air to push warm, moist attic air up and out of exhaust vents. Remember, the exhaust ventilation needs the intake ventilation for the system to be effective. Intake ventilation includes soffit and undereave vents, like those in the GAF Master Flow® product line.

Installing intake ventilation may often require you to collaborate with other trades like siding or carpenters to ensure proper intake ventilation is installed. You may even have to make sure the painter hasn't painted over the intake vents at the eaves and that they are clear of any attic insulation or debris. If coordinating with the other trades simply isn't an option, or you're doing a re-roofing job, check out Cobra IntakePro®, an intake vent that keeps roofers on the roof. Similar to a ridge vent, an air slot is cut into the lower portion of the roof deck to allow a continuous flow of intake air into the attic.

Climate-Appropriate Ventilation Products

Installing the right products for the region's climate so that the ventilation system runs at peak performance is key. For example, a product like Cobra® SnowCountry® features an internal snow filter for colder, snow-prone environments. Even without the risk of regular snowfall, it's always smart to use a filtered ridge vent in colder climates or those in higher altitudes.

On the other hand, the Cobra® Rigid Vent 3™ is designed specifically for handling attic ventilation in warmer climates. The right roofing products work with proper attic ventilation options to help keep roofing systems healthy and balanced. This vent is not only designed to allow heat and moisture to escape the attic, it also helps resist wind-driven rain infiltration.

GAF offers a broad line of attic ventilation products including ridge, hip, intake, power, and other off-ridge ventilation solutions for use on virtually any roof design and in any climate. Installing the right ventilation products in a properly balanced system helps to keep your customers' roof systems functioning properly for years to come.

Continue to elevate your roofing knowledge and business skills through online education with the experts at the GAF Learning Portal. (If you're accessing the Learning Portal for the first time, use Branch code: GAF when registering.)

About the Author

Jeff Avitabile is sr. product manager for GAF, covering various GAF steep slope accessory and specialty products. Jeff has been with GAF for over 17 years in various marketing roles and responsibilities. Before GAF, Jeff was an inside-sales and technical representative for a wholesale building materials distributor in Northern New Jersey.

Related Articles

Roofer climbing a ladder leaning against the roof of a house.
Residential Roofing

What Are Ladder Hooks?

As a roofing contractor, keeping yourself and your employees safe is crucial, which involves using the right equipment. Ladder hooks, sometimes referred to as roof hooks, are used to secure a ladder over the top of a roof's ridgeline. They're an essential piece of safety equipment for steep-slope roofing work.How Do Ladder Hooks Work?These hooks resemble a shepherd's crook that hooks over the roof's ridgeline and stays put with an attached T-bar to secure it to the other side of the ridge. The bottom of the crook has a smaller hook that holds the ladder and prevents it from slipping or sliding down the roof. Ladder hooks are typically made from heavy-duty steel and can support several hundred pounds. They essentially turn the ladder into a more stable set of stairs, creating a safer and more efficient work environment for roofing professionals, especially during steep-slope work.Most hooks also feature a rubber wheel that can help you get the ladder safely up onto the roof. Once you secure the hook on the rungs of the ladder, roll the ladder up the slope (on its back). When it passes the roof ridgeline, flip the ladder over to secure the hooks over the top of the ridgeline.Why Should You Use a Ladder Hook?According to the American Ladder Institute, 500,000 people are treated for injuries from using ladders every year, with 300 of those injuries leading to fatalities. With newer home styles featuring more dramatic rooflines with steep pitches, you may find yourself facing 10:12, 12:12, and higher pitches more regularly. Ladder hooks can help make working on these roofs safer.They can provide stability and security on lower-pitched roofs, too. You may also want to use them for performing repairs around skylights or chimneys, especially if the roof surface is icy or slippery. And they can provide secure footing in cases of suspected damage, such as a weak or rotting deck.These safety devices are designed to prevent the ladder from damaging shingles, so there's no downside to using them.Can a Ladder Hook Replace Other Safety Measures?Using a ladder hook can make you feel more secure and stable on a steep pitch. But you shouldn't forego other safety measures, such as using a personal fall arrest system consisting of lifelines, lanyards, and deceleration devices attached to an anchor point and connected to the body harness. Remember, the anchorage should be able to support 5,000 pounds per employee. Ladder hooks are designed to secure the ladder to the rooftop—not to secure a person or prevent them from falling.How Do You Choose the Right Ladder Hook?To find the right ladder hook, contact your ladder's manufacturer to see if it has a hook designed to work with its ladders. If it doesn't offer any, review the ladder hook manufacturer's guidelines to see what types of ladders are best suited for its hook. If your ladders are due for replacement, you can also look for manufacturers that offer kits with both the ladder and the hook.For more learning opportunities and resources to help you succeed in your roofing business, visit the GAF Center for the Advancement of Roofing Excellence (CARE).

By Authors Karen L Edwards

March 18, 2024

Contractor installing a residential roof
Residential Roofing

When Is the Best Time to Replace a Roof?

If every day was sunny, mild, and a pleasant 75 degrees, there'd be little reason to wonder about the best time to replace a roof. Of course, not everyone lives in areas with ideal weather conditions, as climates vary greatly across the country.So if a client ever asks, "When is the best time to replace a roof?" your answer will likely vary based on where they live and what each season is like. However, you can share some general pointers in response. Here's what to consider for each season to help answer the question, "when is the best time to replace a roof?"SpringSpringtime is traditionally recognized as the kickoff of roofing season, as outside temperatures begin to warm and activity increases. Thanks to melting ice and snow, it's also the time of year that homeowners may want to have their roofs checked out for damage.While spring offers outdoor temperatures that are more friendly for workers, the season also typically comes with an increased chance of severe thunderstorms (and potentially tornados, depending on the region). Spring is usually a good time to schedule a roof replacement if you just monitor the weather forecast for major events to help reduce the chance of delays.SummerWith spring showers in the rearview, most areas of the country see longer stretches of nice weather during summertime, which lends itself well to working outside. Accordingly, summer tends to be the most ideal time for installing a new roof.But with potentially hot days, when is the best time to replace a roof in the summer? Workers will need to start as early in the day as possible because temperatures are usually cooler in the morning. Depending on the forecast temperatures, the job may need to be spread over a few days, so most of the work can be done in the morning hours before it gets too hot. It's also wise to remind customers that workers will need to have breaks in the shade and access to water to stay hydrated.FallThe autumn months can be an equally good time for a roof replacement as summer, as the hot and hazy days have passed, and severe weather isn't as common. The only exception to this is if you're working in an area prone to hurricanes. Hurricane season runs through the end of November and can cause project delays.In addition to the favorable weather, fall is a popular season for roof replacement because many property owners want to fortify their homes and buildings with a new roof before the winter months.WinterIn some areas of the country, it may be possible to continue roofing installations year-round, including during the winter. In southern regions, for example, roofing replacements can often be completed in the winter, as there's less chance of inclement weather. Temperatures may drop, but not as drastically as in areas that see ice and snow more regularly. Of course, it's still important to reference the relevant local forecast when scheduling upcoming work.Sustained stretches of very cold weather does not constitute suitable weather for the installation of asphalt shingles. All self-sealing shingles must be exposed to warm, sunny conditions for several days before they completely seal. Before sealing occurs, shingles are vulnerable to blow-offs and wind damage. Shingles installed in fall or winter may not seal until the following spring. Shingles that are not exposed to direct sunlight, adequate surface temperatures, or that are not fastened or installed properly may never seal. Failures to seal, blow-offs, and wind damage under these circumstances result from the nature of self-sealing shingles, and are not covered under most manufacturer's warranties. Be sure to follow the manufacturer's instructions for proper installation. While most provide guidance about cold weather installations, it will ultimately be up to you to exercise discretion about when to move forward with an installation vs. postponing the work until more favorable weather conditions are present.Other Factors That May Affect Project TimingWhile weather is likely the leading factor that can disrupt scheduled roofing work, if you want to best answer your client's question of "when is the best time to replace a roof?" you'll need to take other factors into account when setting timeline expectations for property owners. One such consideration is the lead time needed for materials. If your customer chooses an uncommon color or a specialty product, it may take longer for materials to arrive.Another factor to weigh is your own backlog. If your production calendar is booked weeks out, clearly communicate the timing to your customers with the knowledge that weather events could impact the schedule. Regularly communicating with customers and setting accurate expectations are key to a positive experience.Looking to learn more roofing best practices and further expand your knowledge base? Check out GAF's CARE Contractor Training Center to help build your skill set and receive valuable training.

By Authors Karen L Edwards

February 12, 2024

A coil of roofing nails on a new roof in progress
Residential Roofing

All about Roofing Nails for Shingles

Even the smallest details play a role in a roof's effectiveness and integrity. Shingles and flashing are among the most noticeable roofing materials, but roof nails often get overlooked—despite being just as important as more obvious elements. And since they can greatly differ in size, material, and length, using the wrong nails to secure certain areas can cause all kinds of problems down the road.Types of Roofing NailsWhen nailing shingles, roofers mostly choose from among these four common types of roofing nail:Typical roofing and ring-shank nails are the most commonly used. Typical roofing nails may have a smooth or circular unconnected rings around the body to help them maintain grip in the deck. Ring shank nails have connected rings around the shaft which give them superior withdrawal resistance during high winds. Either nail will keep shingles securely attached to the roof when installed according to the manufacturer's instructions. That said, ring shank nails have superior withdrawal resistance—which is why they're typically used in high-wind areas and are often required by local codes. Both of these nail types also offer strength and the ability to penetrate the deck below with ease.Square and round cap nails are more commonly used for roof underlayment than shingles. The larger caps provide holding power that keeps the underlayment material in place using fewer nails.Types of Roofing Nail MaterialsWhat the nail is made of is often just as important as the type of nail:Galvanized steel: While less corrosion-resistant than stainless steel, these nails are popular as they still have strong corrosion- and rust-resistance (courtesy of their zinc coating) but cost much less than stainless steel. There are two main types: hot-dipped galvanized and electro-galvanized. Hot-dipped is more robust, since the nail is immersed in a melted zinc solution, which creates a strong coating. Electro-galvanized combines electricity with a less powerful chemical solution to create a thinner zinc coating.Copper roofing nails are resistant to corrosion and can last much longer than steel. However, they're typically a more expensive option. Copper is more often used when installing long-lasting roofing materials like tile and clay. If you use copper flashing for the roof, it's best practice to use the same material for the nails. However, steel nails are acceptable, though mixing galvanized nails with copper can cause a galvanic reaction that leads to some corrosion in both.Stainless steel nails are typically only used in environments very likely to cause corrosion, most commonly in coastal regions.Aluminum nails are not as commonly used, especially in coastal areas since salt spray can damage the nail and may cause it to deteriorate prematurely.Nails for Roof Underlayment, Flashing, and SheathingDifferent roof components call for different nails. For underlayment, use square cap nails for felt and round head for synthetics (both nail types come with either metal or plastic caps). When installing flashing, you can simply opt for the same nails for the shingles, as they don't require any special properties. For flashing and sheathing, standard roof nails will do the trick.Hand-Driven Nailing vs. Pneumatic NailerYou will need to decide whether to hand-drive the nails with a hammer or use a pneumatic nailer.Using the pneumatic nailer is a much faster solution than hammering manually. Many shingles come with warranties that require you to install at least four nails per shingle, with some of them needing up to six. As well as time considerations, using a pneumatic nailer is obviously significantly less physically demanding than manual hammering.That said, an upside of using a hammer is that you have better overall control over nail placement. You can ensure a nail is tightly fitted and properly penetrates the decking, which can help in the long term as issues may arise if a nail is over- or under-driven. When nails are over-driven—meaning they go well past the material below it—it can cause openings in the shingles which can lower wind resistance (among other issues). When under-driven, nails don't fully penetrate the decking, which can lead to loose or falling shingles and leaks over time.Size and Length of Roofing NailsTypically, a roofing nail measures anywhere from 1 to 2 inches. A roofing nail should be long enough to penetrate the shingle and then as the plywood or OSB decking beneath by at least 3/4 of an inch. The sheathing thickness can vary, so you may need longer nails depending on the decking used.Keep in mind that some parts of the roof—like hip and ridge cap shingles, and ventilation accessories such as a ridge vent—require longer nails. Some premium or designer shingles may also require longer nails than standard 3-tab shingles, as they tend to be thicker (usually often consisting of two shingle strips fused together).Another thing to note is that 3/4-inch or 7/8-inch nails may be used at open soffit areas so as to not completely penetrate the decking. Completely penetrating the decking can cause the material underneath—most often finished wood—to splinter as well as the nail to be visible from the ground.Most manufacturers recommend using zinc-coated steel or aluminum, 10-12 gauge, barbed, deformed, or smooth shank roofing nails with heads 3/8" (10mm) to 7/16" (12mm) in diameter. Fasteners should be long enough to penetrate at least 3/4" (19mm) into wood decks or just through the plywood decks. Fasteners must be driven flush with the surface of the shingle. Over-driving will damage the shingle. Raised fasteners will interfere with the sealing of the shingles and can back out.Apply Your Nail Knowledge in Practice!While useful, having a good working knowledge of what materials to use for a job is only half the equation. If you'd like hands-on training to see how to apply your knowledge in practice—and given by some of the leading experts in roofing—check out the GAF CARE Contractor Training Center.

By Authors Mark Soto

December 14, 2023

Don't miss another GAF RoofViews post!

Subscribe now