Hurricanes are characterized by strong winds, which can cause significant uplift pressure on your roof. If your home isn't properly prepared, this amount of force can lift or even tear the roof right off your home. Hurricane straps are critical tools that help ensure your roof remains attached to your house in the event of a hurricane.
Also known as hurricane clips or hurricane ties, these metal fasteners connect your home's roof trusses to its walls, helping reduce structural damage during hurricanes. In fact, many hurricane-prone areas require these straps in new construction homes by law. Here's what you should know about hurricane straps, including how they help secure your home and what to expect from professional installation.
Types of Hurricane Straps
Depending on your roof trusses and the rafter's location, a professional roofer can install different types of hurricane straps. All straps include holes for fasteners or nails to go through—the mechanism that connects the rafters to other rafters and the walls in your home. When preparing your home for a hurricane, a roofer will often use a combination of different roof strap designs.
Single-Sided Hurricane Ties
Single-sided hurricane ties connect two or three rafters. They typically come in two configurations: both featuring a twist, one tie forms a triangle shape in the middle that connects two rafters, while the other has a trapezoid shape that connects three rafters. The triangle-shaped twist ties are shorter. The trapezoid twist ties have more fasteners, and they're typically better suited for areas expecting high winds since they can distribute the load among more trusses.
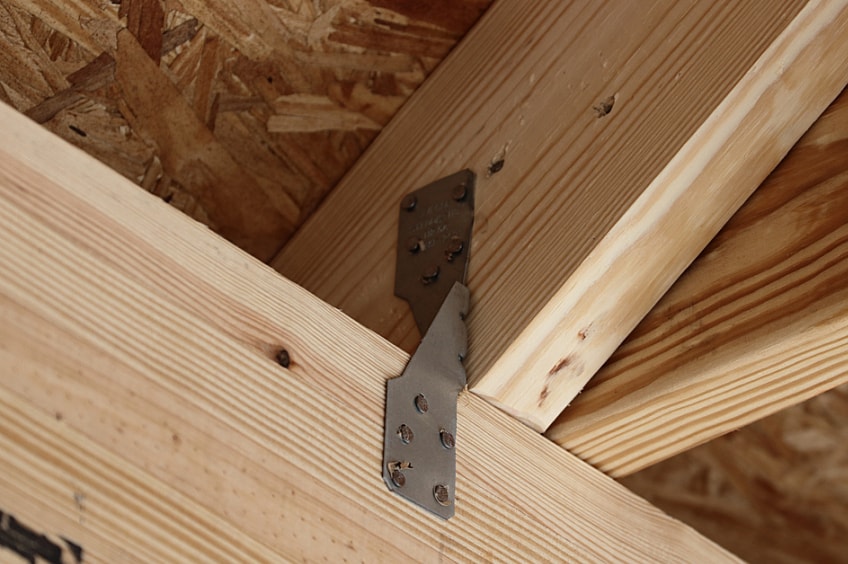
U-Shaped Hurricane Clips
Aptly named, U-shaped hurricane clips form the shape of a U to allow a rafter to go through, anchoring it to the walls below. U-shaped hurricane clips provide excellent stability and are generally stronger than single-sided hurricane ties. When using hurricane clips, contractors just need to ensure that the width of the rafters is similar in size to the clip's opening.
Galvanized Versus Stainless Steel
Apart from these different designs, hurricane straps may be built from galvanized or stainless steel. Both of these materials are strong and have excellent corrosion-resistant capabilities. Galvanized steel is generally cheaper. Manufacturers add a zinc coating to protect against rusting, but it can eventually wear off. Stainless steel is more expensive but longer-lasting, as its alloy composition makes it naturally corrosion-resistant. Overall, material costs are less influential than labor costs when it comes to the overall cost of installation.
Installing Hurricane Roof Strapping: What to Expect
Installing hurricane straps is not a DIY project. Experienced professionals should always perform this task, and they must follow various safety and legal guidelines throughout the installation process. Contractors routinely bring in engineers for their professional input, and building inspectors need to approve the work after it's done.
As far as tools and equipment, roofers will need a ladder, fasteners, and a nailer. They should always wear safety equipment, including a helmet, safety goggles, and gloves.
Assessment
A professional roofer will start by inspecting your rafters and trusses. From there, they'll assess how many and which type of hurricane straps they'll need based on various structural connections, including where your rafters and trusses connect to the walls. Your home may have requirements regarding the minimum number of straps depending on where you live.
Roofers may bring in the expert knowledge of a structural engineer at this stage to help determine the strength of your roof and the necessary amount of hurricane ties to effectively handle the expected wind loads.
Installation
Once they've established the type and number of hurricane straps and their installation locations, your roofer might need to tear off some parts of the roof. This can depend on various factors, such as the slope of the roof, how easy it is to access the attic, and where the ties need to be installed. If your roofer needs to remove material, they'll begin to tear off the shingles to access the rafters below.
Then, they'll begin to install the straps, adding them according to the rafter and trusses' position and nailing them in with the amount of fasteners recommended by the engineer.
Inspection
Once installed, most roofers will have a house inspector come by and approve the work before they finish replacing the roof. Since hurricane-prone areas have rules and regulations for installing hurricane ties, an inspector will ensure everything is done correctly and that your straps will hold up in an emergency. Once the inspector approves the work, the roofer will finish the rest of the roof replacement.
Avoiding Common Mistakes
One common mistake that inexperienced roofers tend to make is not using enough materials. That's why a structural engineer's input is so important. They can accurately determine the number of hurricane straps your home needs based on your situation.
Another common mistake is installing the straps with just any nails. Because roofs are exposed to moisture, contractors should use corrosion-resistant nails. Some hurricane strap manufacturers may also have specific nail requirements, such as 8d or 10d nails. Your contractor can determine the correct nail size by reading the manufacturer's instructions.
Seek Professional Support to Protect Your Home
To learn more about securing your home for hurricanes, visit the GAF Hurricane Resources page. If your home doesn't already have hurricane straps installed, search for a trustworthy contractor in your area to handle this for you. Even if your local building codes don't require them, it's never a bad idea to be prepared for whatever comes your way.
