RoofViews

Commercial Roofing

How to Install TPO Membrane

By GAF Roof Views

September 11, 2020

Installing TPO Membrane | Roofing it Right with Dave & Wally by GAF

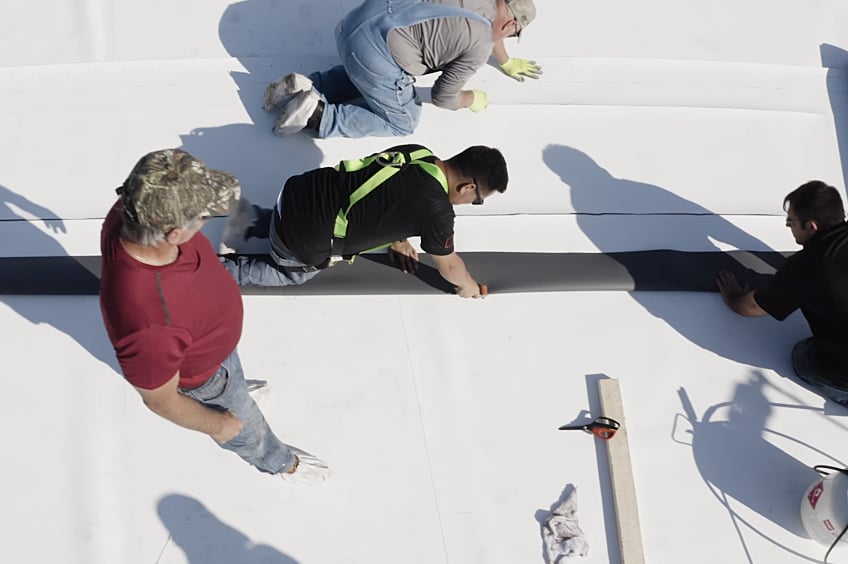
From seam direction to welding robot heat calibration to countering wind resistance, proper TPO installation is an art and a science. Watch GAF Senior Commercial Training Specialists Dave Scott and Wally Brown (Dave & Wally) as they install a TPO membrane in Part 8 of the Roofing it Right miniseries on installing a commercial roof, from start to finish.

Watch the full Roof Project from Start to Finish miniseries here.

About the Author

More homes and businesses in the U.S. are protected by a GAF roof than by any other product. We are the leading roofing manufacturer in North America, with plants strategically located across the U.S. As a Standard Industries company, GAF is part of the largest roofing and waterproofing business in the world.

Related Articles

A roof with a fleeback membrane being installed by contractors.
Commercial Roofing

What to Know about Fleece-Back TPO

As a contractor, you're constantly on the lookout for ways to get the job done quickly while continuing to provide a high level of quality to customers. Carefully selecting the materials you use can help—and with new roofing technologies being developed every day, you have a lot of options.Thermoplastic polyolefin (TPO) single-ply membranes are a cost-effective solution for commercial roofs. And when you add a fleece backing, the resulting fleece-back TPO adds even more durability, protection, and strength to the system. The material can be used for both reroofing projects and new installations.The Benefits of Fleece-Back TPO MembranesHere are a few reasons TPO with a fleece backing might be the perfect solution for your next roofing job:1. Performance and DurabilityFleece-back TPO, like GAF Everguard® TPO Fleece-Back Membrane, provides excellent performance and durability. It's available in a variety of new thicknesses that make it easier than ever to find one that's suitable for your project. For instance, the GAF EverGuard® TPO Fleece‑Back 100, 115, and 135 Membranes offer good impact resistance, as some systems are approved under Factory Mutual (FM) 4470 - Very Severe Hail (Class 1 - VSH).* These membranes are especially suitable for high-traffic roofs, because they provide added protection during regular maintenance of HVAC systems, for example.2. Ease of InstallationInstalling fleece-back TPO membranes can be done easily and efficiently, saving roofers time and labor. They can be mechanically attached for fast installation, or combined with adhesives like the GAF LRF Adhesive XF to reduce overall thermal bridging and add wind resistance capabilities.Commercial building owners and property managers that want jobs finished as quickly as possible will find mechanically attached fleece-back TPO membranes to be an excellent option. Watch the following video to see how they're installed:Because of their versatility, fleece-back TPO membranes are also a popular choice for reroofing projects if your customer isn't looking to completely remove an existing roof:3. UV Ray Protection and Energy SavingsFleece-back TPO membranes come in white and light colors, and they're designed to be ultraviolet (UV) resistant and reflect the sun's rays. By reflecting the sun rays away from the roof, white or light fleeceback TPO membranes can help lower the temperature of the roof and increase the roof's longevity.4. Excellent Warranty or Guarantee CoverageThe robust build of fleece-back TPO membranes means manufacturers can often offer good warranty or guarantee coverage. Depending on the thickness of the membrane and the method of attachment, you could be covered from 20 to 25—or even up to 30—years. This reflects confidence in the quality of the material and provides peace of mind for property owners and managers.Other Considerations for Fleece-Back TPO RoofingWhile fleece-back TPO membrane is typically more expensive than other commercial roofing solutions like smooth TPO, the installed cost may be comparable depending on the installation method used: you can estimate the cost of the EverGuard® Fleece-Back TPO needed for your project using the TPO Material Calculator on the GAF EverGuard® TPO Fleece‑Back Membrane product page. As an added benefit, GAF EverGuard® TPO membranes are made in the U.S.A. with domestic and imported materials.The speedy installation possible with these membranes is convenient for customers and contractors alike, and the durability provides long-term performance. Plus, the fleece-back TPO works well in all areas—even those with harsh weather—so it's not limited to specific locations.If this TPO sounds like the perfect material for your next project, visit the GAF EverGuard® TPO Fleece‑Back product page to learn more.*See FM Global Data Sheet 1-34 for more information. Visit RoofNav.com for approved assemblies.

By Authors Mark Soto

June 27, 2023

Contractor working on a roof
Commercial Roofing

Roof to Wall Flashing: Why Details Matter for Single-ply Roofing Systems

Roof to wall flashing is critical to the performance of every single-ply roofing system. These transition points, where the flat part of the roofing system is tied into the parapet wall, are potentially vulnerable areas for water intrusion. Following the requirements for proper flashing can help ensure that the roof system offers better protection. How do you install flashing on the wall and roof? Seasoned roofing industry professional Dave Scott of Roofing it Right with Dave and Wally talks through the various roof flashing methods and shares tips for success in a recent webinar. High Wall Flashing with Screws and Plates GAF Everguard™ TPO or PVC single-ply roofing systems require flashing between the flat roof surface and the adjoining wall. When using plates and fasteners, Dave refers to GAF detail 317C, High Wall Flashing with Plates and Fasteners. EnergyGuard™ polyiso insulation should act as the base layer where the roof meets the bottom of the wall. The detail indicates that the insulation should not be greater than 8 inches. As Dave explains, "The reason you don't want the insulation to be thicker than 8 in. is because of the pendulum effect on your fasteners. As the sheet billows or moves, the fastener could lean, causing an egg shape in the hole, and your uplift resistance isn't what it should be." Using Drill-Tec™ fasteners and plates, a reinforced membrane should be installed over the insulation, 12 in. on center. Another layer of reinforced membrane goes over that, extending up the wall and leaving a 6-in. lap on the roof so that it can be heat-welded into place. The membrane is attached to the wall using the fasteners and plates, again at 12 in. on center for base attachment. Contractors have an alternate option for the base layer when installing roof to wall flashing: rather than using plates and fasteners, Dave says that opting for a termination bar is an option, as long as it is not higher than 3 in. The next layer of membrane goes onto the wall, covering the first row of fasteners. Dave explains that up to 24 in. in height, the membrane can be dry hung on the wall. "If you are dry hanging the wall flashing, you are using a 30-in. sheet with a 6-in. lap. Basically, a 30-in. sheet is a half sheet, which is a 5-foot sheet cut in half. You'll have 30-in. flashings up the wall with a 24-in. reveal." It is crucial to remember to use EverGuard Cut Edge Sealant on all cut edges of the reinforced TPO membrane. High Wall Flashing with 10-ft. Wide Sheets In detail 317A, Dave reviews the steps for high wall flashing using 10-ft. sheets. The steps are similar to those of 317C: a base layer of EnergyGuard polyiso and then a layer of reinforced membrane, attached using fasteners and plates. With 10-ft sheets, the next step requires that EverGuard Bonding Adhesive be applied to the roof and the wall, followed by the installation of the 10-ft wide membrane. Plates and fasteners get installed at the seam—vertically up the wall at 12 in. on center and a minimum of 10 ft. from any corner or end of wall. Laps are heat-welded, and the process continues until the wall flashing is complete. "The maximum parapet wall height is not to exceed the width of a 10-ft. sheet," Dave notes. "You're going to have 6 in. on the deck, so on a 10-ft. sheet that gives you 9 [ft.], 6 [in.], so hopefully you can get over the top and install a cap." A termination bar is acceptable at the top if the sheet is not able to go up and over, according to Dave. High Wall Flashing with 5-Ft. Wide Sheets Drawing 317B reviews requirements for high wall flashing with 5-ft. wide sheets of membrane. It begins in a familiar way: with polyiso and membrane attached with fasteners and plates. The 5-ft. wide sheets are run vertically up the wall and attached with 12-in. on center fasteners also running vertically up the wall. Sheet laps are heat-welded, and the fasteners continue with vertical attachments spaced every 5 ft. along the wall. Dave likes the versatility of the 5-ft. wide sheets. "The beauty of this is you can go as high as you want. If you have a 15-ft. wall, you can run a five-footer all the way to the top of that 15-ft. wall, and you don't need glue," he says. Intermittent Fastening and Vertical Sheet Layout Fastening patterns are key to the success of the system. Detail 317D shows the unique placement of the fasteners as well as how attachment plays a critical role at the corners and the ends of the building. As Dave explains, "The first three sheets from each end of the building require a row of fasteners, 12 in. on center. Once you reach the interior corner, three sheets out from the corner each way also require the fasteners." EverGuard cover tape or an 8-in. flashing strip should be installed over the fasteners. However, Dave notes that the fasteners being midway up the sheet make it conducive to using RhinoBond® to avoid penetrating the membrane. Details matter when it comes to roof flashing. Fortunately, the experts at GAF are on hand to help you determine the best methods and find success. For more information on roof to wall flashing, register to view the full webinar. For additional courses and training opportunities, visit www.gaf.com/care.

By Authors Karen L Edwards

August 06, 2021

Dave and Wally perform a roof inspection
Commercial Roofing

Inspecting a Commercial Roof: Is It Time for a Repair or Replacement?

When a building owner asks you if they need a commercial roof repair or replacement, your assessment of the roof's condition hinges on a few key areas. Veteran commercial roofing experts Dave Scott and Wally Brown share their roof inspection expertise in GAF's Roofing It Right with Dave and Wally: Roof Project from Start to Finish video series to help you assess the condition of critical areas on the roof. Before your inspection, gather as much information about the roof as you can from the building owner. Some questions you may want to ask include: Do they know what the roof system is? What is the age and condition of the roof? Are they experiencing any leaks or damage? When was it last inspected or repaired, and what kind of traffic have they had on it? The more knowledge you have about the specific roof in question, the more equipped you will be to make a recommendation for the level of repair needed. While talking to the owner in the first video The Master's Eye: Inspection, Dave and Wally discover they are examining a 20-year-old single-ply PVC roof—from there, they determine if the owner would benefit from either a roof repair or replacement. Performing the Inspection Dave explains in the video that he always starts inspections with safety. Once you access the roof, make a note of any areas with potential for concern—such as tripping or fall hazards, skylights, and roof edges—and take special care around them. Once your safety awareness routine is complete, you are ready to examine the following critical areas on the roof. Seams: Seams are a vulnerable point. Over time, they can become loose and require attention, so they are always worth including in your inspection. In Wally and Dave's inspection, they noticed that the PVC roof in question had a seam repaired at some point using EPDM cover tape. That's a red flag, as repairs that were made with incompatible materials can cause the roofing system to degrade and fail prematurely. Equipment on the roof: Commercial rooftops house necessary equipment, including HVAC equipment, gas pipes, and exhaust fans. Take note of the condition of the supports for that rooftop equipment. In Dave and Wally's example, a modified plastic bucket served as cribbing for a rusty gas pipe running along the roof. The combination of exposure to the elements and extreme temperature changes create a perfect recipe for the bucket to deteriorate and allow the rusted pipe to come into contact with the membrane, creating the potential for more damage. Drains: Are there areas of ponded water on the roof? Check the drains for clogged debris and ensure they appear to be in good working order. Keep in mind that even if a drain appears to be newer, it still needs to be installed correctly to carry the water off the roof of the building. During Dave and Wally's inspection, they found that the roof had a newer drain (pictured below), but it had been incorrectly installed over the improperly patched EPDM portion of the roof. Flashing: Rooftop penetrations are often a point of water intrusion when flashings fail. Examine the condition of the flashing, and note whether the welds or fasteners are still secure. It should be easy to tell if there was a previous failure and if repairs were made. Roof Repair or Replacement? After your inspection, let the owner know whether they can fix their commercial roof or if they need to replace it altogether. It's important to help the owner consider the long-term value in their decision. If the roof needs many expensive repairs that will deliver only a few more years of service life, it's probably wise to recommend a roof replacement. On the other hand, if the issues are less complicated and can be easily addressed, roof repair may be a good way to give the owner time to budget and plan for roof replacement in the future. As always, the experts at GAF are available to help you. Check out our resources for commercial contractors, and be sure to tune into the other Roofing It Right with Dave and Wally videos, which cover a wide range of commercial roofing topics including core cuts, tear-offs, tapered insulation, single-ply roofing tips and mistakes, TPO application methods, and more.

By Authors Karen L Edwards

April 08, 2021

Don't miss another GAF RoofViews post!

Subscribe now